March 1st – hooray! Weathering loft update.
 March 1st, 2025 |
  Author:
 It is such a lovely morning blue sky, still and with life stirring all around. It does quicken the pulses.
The construction of the weathering loft as I call it takes up a quarter of my entire book ‘Falconry – aspects of care of the trained falcon and hawk’.
In having a dual-purpose function, it gives the falconer flexibility in bird management. I have tried to make it in a cost-effective way using materials that are widely available. The drawings reflect the use of 2.4m and 3m lengths of 63mm x 38mm timber though out the structure. This is for simplicity. The aim is to encourage people to make the structure – to lift it off the pages and make it a reality.
As I have said different materials may be used in its construction or the weathering loft can be a different size if required. This is all possible with the modular design. In the book there is a method of how to calculate footing size for different sized structures. Also, the same regarding the number of roofing sheets. The step-by-step guide shows the construction pathway from footings – spade in the ground -to the finished weathering loft.
Originally, I was going to show pictures of an existing loft with ‘drawings included’ that I have used for various birds over the years. But I thought well lets just make one – which is what we did. The weather was kind to us during construction. I operated my usual construction method of doing about one hour per day. As my old joinery boss would say it is amazing what you can do in an hour. Without a workshop weather is a key factor and I would advise anyone making the structure to give themselves plenty of time to build it.
As I say in the book the weathering loft is to accommodate a long-lived falcon or hawk and to offer all its needs in the trained environment. The maintenance of the structure is very important and should be done as you go along.
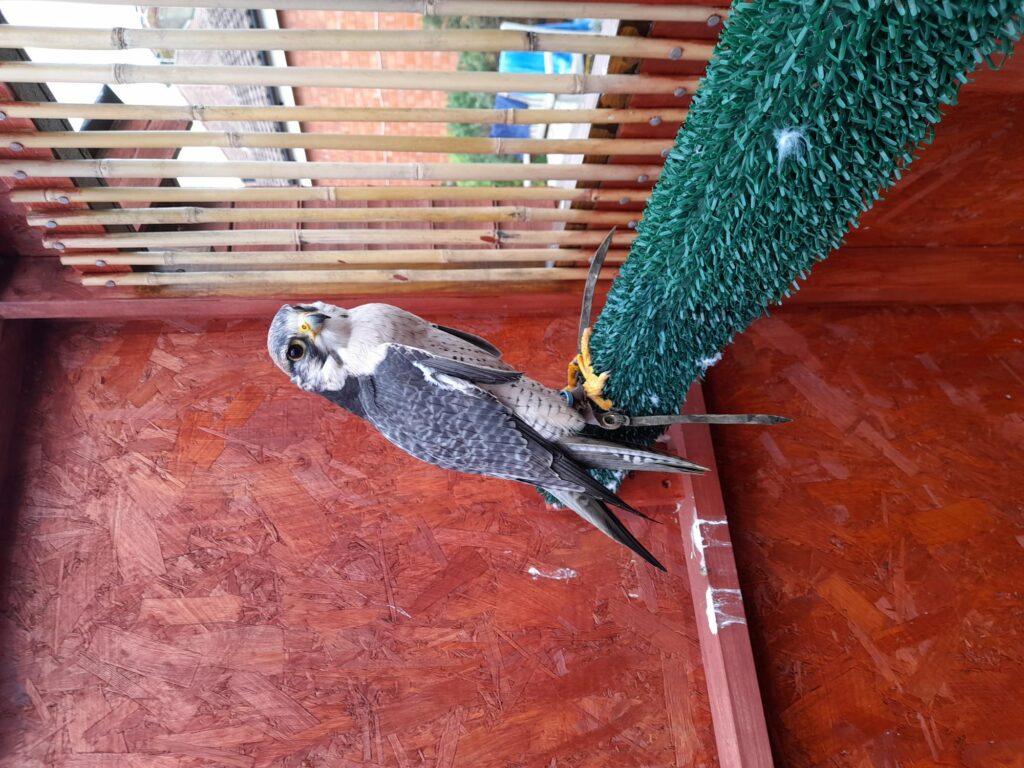
The loft or ‘small weathering loft’ in the book was made to fit into a space and was planned to house a lanneret called ‘Frank’. He is featured in the book. I have used this structure both as a weathering and a loft for Frank. So, its dual-purpose role has been very useful. A lot of Harris hawks can be permanently lofted and after initial training the bird will be loose in the loft all year round. But the weathering if needed is there.
Like building a house once the weathering loft walls are up and the roof is on – it looks finished but sadly the second fix is yet to start and can take just as long. Second fix for the ‘weathering loft’ are the main door, shutter doors, hatch door and then the vertical bamboo slats for the windows, netting behind the shutter doors and then the perching, food platform and chute. Not forgetting the double door entry enclosure.
I have used astroturf to cover all the perches. This not only displaces the weight of the bird through its toes – to prevent bumblefoot – but also to cushion the bird on landing after short flights in the loft.
So, there is a lot to do but it does add to the excitement of getting a bird. The standard weathering loft as I call it is sized for a medium medium sized raptor. I mentioned in an earlier news blog that we had a wild buzzard on rehab for six weeks in a standard loft and it was fine. Amazingly it learned to use the space well. When released it was in perfect condition. I was very happy about that.
Below is a picture of the weathering loft in loft mode with the shutter doors closed.

Frank below looking out of the loft window. Note the astroturf covering on the perch and also his permanent flying jesses with no slots at the end for the attachment of the swivel These permanent flying jesses are a kind of new invention but ever so so useful when getting the bird out of the loft and when flying the bird.
 Posted in Uncategorized